Customized Include Layout

Web Hosting
In this tutorial, I will show you how to include layout and customized it's content in different pages. See output below.

This is the layout in layout.xml


This is the output when you run this layout.


As you noticed that the title and image are different in the output. This is because, I change its content during runtime.

This is the code in your MainActivity.java

public class MainActivity extends Activity implements OnClickListener{

TextView header_title;
ImageButton home, clear;
@Override
protected void onCreate(Bundle savedInstanceState) {

super.onCreate(savedInstanceState);
//this.requestWindowFeature(Window.FEATURE_NO_TITLE);
setContentView(R.layout.main_layout);       
initializeVar();    
}

public void initializeVar(){
from = (TextView) findViewById(R.id.tv_sender_name);
header_title = (TextView) findViewById(R.id.tv_header_title);
header_title.setText("Custom Title");
home = (ImageButton) findViewById(R.id.i_btn_home);
clear = (ImageButton) findViewById(R.id.i_btn_clear);
other = (ImageButton) findViewById(R.id.i_btn_sample);

//use to hide the button you dont need to use.
other.setVisibility(View.GONE);

//use when you change the image in image button during runtime,
//clear.setImageResource(R.drawable.ic_input_delete_default);
other.setOnClickListener(this);
home.setOnClickListener(this);
clear.setOnClickListener(this);
}


@Override
public void onClick(View id) {

switch(id.getId()){

case R.id.i_btn_home:
//do something
break;
case R.id.i_btn_clear:
//do something
break;
case R.id.i_btn_sample:
//do something
break;
}

}


This is the code in your layout.xml

<RelativeLayout xmlns:android="http://schemas.android.com/apk/res/android"
        android:id="@+id/rl_second"
        android:layout_width="fill_parent"
        android:layout_height="wrap_content"
        android:layout_alignParentRight="true"
        android:layout_centerHorizontal="true"
        android:background="@drawable/header_background"
        android:layout_alignParentTop="true" >

        <ImageButton
            android:id="@+id/i_btn_home"
            android:layout_width="wrap_content"
            android:layout_height="wrap_content"
            android:layout_alignParentLeft="true"
            android:layout_centerVertical="true"
            android:background="@drawable/header_background"
            android:paddingBottom="5dp"
            android:paddingLeft="12dp"
            android:paddingRight="12dp"
            android:paddingTop="5dp"
            android:src="@drawable/home" />

        <TextView
            android:id="@+id/tv_header_title"
            android:layout_width="wrap_content"
            android:layout_height="wrap_content"
            android:layout_centerInParent="true"
            android:layout_centerVertical="true"
            android:textColor="#FFFFFF"
            android:textSize="20sp"
            android:textStyle="bold"
            android:text="Title Here" />

        <ImageButton
            android:id="@+id/i_btn_clear"
            android:layout_width="wrap_content"
            android:layout_height="wrap_content"
            android:layout_alignParentRight="true"
            android:layout_centerVertical="true"
            android:background="@drawable/header_background"
            android:paddingBottom="5dp"
            android:paddingLeft="12dp"
            android:paddingRight="12dp"
            android:paddingTop="5dp"
            android:src="@drawable/ic_discard" />

        <ImageButton
            android:id="@+id/i_btn_sample"
            android:layout_width="wrap_content"
            android:layout_height="wrap_content"
            android:layout_alignParentTop="true"
            android:layout_toLeftOf="@+id/i_btn_clear"
            android:background="@drawable/header_background"
            android:paddingBottom="5dp"
            android:paddingLeft="12dp"
            android:paddingRight="12dp"
            android:paddingTop="5dp"
            android:src="@drawable/home" />

    </RelativeLayout>

And to use it, you just include layout.xml in main_layout.xml

<RelativeLayout xmlns:android="http://schemas.android.com/apk/res/android"
    xmlns:tools="http://schemas.android.com/tools"
    android:layout_width="match_parent"
    android:layout_height="match_parent"
    android:background="#FFFFFF"
    tools:context=".MainActivity" >

    <include
        android:id="@+id/i_header"
        layout="@layout/layout" />

    <!-- more layout code here -->
</RelativeLayout>

And lastly is header_background.xml

<?xml version="1.0" encoding="utf-8"?>
<selector xmlns:android="http://schemas.android.com/apk/res/android" >
     <item android:state_pressed="true" >
         <shape android:shape="rectangle"  >
             <corners android:radius="0dip" />
             <stroke android:width="0dip" android:color="#000000" />
             <gradient  android:angle="-90"  android:startColor="#FF0000" android:centerColor="#800000" android:endColor="#FF0000"  />            
         </shape>
     </item>
    <item android:state_focused="true">
         <shape android:shape="rectangle"  >
             <corners android:radius="0dip" />
             <stroke android:width="0dip" android:color="#000000" />
             <solid  android:color="#FF0000"/>       
         </shape>
     </item>  
    <item >
        <shape android:shape="rectangle"  >
             <corners android:radius="0dip" />
             <stroke android:width="0dip" android:color="#000000" />
             <gradient  android:angle="-90"  android:startColor="#FF0000" android:centerColor="#FF0000" android:endColor="#800000" />            
         </shape>
     </item>
</selector>
Web Hosting
That's it. Hope this may help you. Happy Coding.

Customized Toast

Web Hosting
In this tutorial, I will show you how to customized Toast in Android. See output below.


Next is add this image in your drawable folder.

Next is add this custom_toast.xml in your drawable folder.

<RelativeLayout xmlns:android="http://schemas.android.com/apk/res/android"
    android:id="@+id/rl_main"
    android:layout_width="fill_parent"
    android:layout_height="wrap_content" 
    android:background="@drawable/toast_corner">

    <ImageView
        android:id="@+id/iv_icon"
        android:layout_width="70dp"
        android:layout_height="50dp"
        android:layout_alignParentLeft="true"
        android:layout_alignParentTop="true"
        android:src="@drawable/warning_icon" />

    <TextView
        android:id="@+id/tv_toast"
        android:layout_width="wrap_content"
        android:layout_height="wrap_content"
        android:layout_alignParentTop="true"
        android:layout_toRightOf="@+id/iv_icon"
        android:paddingRight="16dp"
        android:paddingBottom="5dp"
        android:text="Toast"
        android:textColor="#FFFFFF"
        android:textStyle="bold" />

</RelativeLayout>

Next is add this toast_corner.xml to your drawable folder for the radius of your toast.

<shape
    xmlns:android="http://schemas.android.com/apk/res/android"
    android:shape="rectangle"   >

    <solid
        android:color="#000000" >
    </solid>

    <stroke
        android:width="2dp"
        android:color="#000000" >
    </stroke>

    <padding
        android:left="5dp"
        android:top="5dp"
        android:right="5dp"
        android:bottom="5dp"    >
    </padding>

    <corners
        android:radius="11dp"   >
    </corners>

</shape>

Next is your main_layout.xml

<RelativeLayout xmlns:android="http://schemas.android.com/apk/res/android"
    xmlns:tools="http://schemas.android.com/tools"
    android:layout_width="match_parent"
    android:layout_height="match_parent"
    android:paddingBottom="@dimen/activity_vertical_margin"
    android:paddingLeft="@dimen/activity_horizontal_margin"
    android:paddingRight="@dimen/activity_horizontal_margin"
    android:paddingTop="@dimen/activity_vertical_margin"
    tools:context=".MainActivity" >

    <Button
        android:id="@+id/btn_toast"
        android:layout_width="wrap_content"
        android:layout_height="wrap_content"
        android:layout_alignParentTop="true"
        android:layout_centerHorizontal="true"
        android:text="Show Toast" />

</RelativeLayout>

And lastly is your MainActivity.java

package com.client.apps.views.toast;

import android.os.Bundle;
import android.app.Activity;
import android.view.Gravity;
import android.view.Menu;
import android.view.LayoutInflater;
import android.view.View;
import android.view.ViewGroup;
import android.view.View.OnClickListener;
import android.widget.Button;
import android.widget.TextView;
import android.widget.Toast;
 
public class MainActivity extends Activity implements OnClickListener{
 
Button btn_toast;

@Override
protected void onCreate(Bundle savedInstanceState) {
super.onCreate(savedInstanceState);
setContentView(R.layout.activity_main);
 
btn_toast = (Button) findViewById(R.id.btn_toast);
btn_toast.setOnClickListener(this);
}
 
@Override
public boolean onCreateOptionsMenu(Menu menu) {
// Inflate the menu; this adds items to the action bar if it is present.
getMenuInflater().inflate(R.menu.main, menu);
return true;
}

@Override
public void onClick(View v) {
// TODO Auto-generated method stub
switch(v.getId()){
case R.id.btn_toast:
Toast("Invalid Entry, Please Check. Just Give me a reason!");
break;
}
}

public void Toast(String toast){
//get the LayoutInflater and inflate the custom_toast layout
LayoutInflater inflater = getLayoutInflater();
View layout = inflater.inflate(R.layout.custom_toast, (ViewGroup)
findViewById(R.id.rl_main));
 
//get the TextView from the custom_toast layout
TextView text = (TextView) layout.findViewById(R.id.tv_toast);
text.setText(toast);
 
//create the toast object, set display duration,
//set the view as layout that's inflated above and then call show()
Toast t = new Toast(getApplicationContext());
t.setDuration(Toast.LENGTH_LONG);
t.setGravity(Gravity.CENTER_VERTICAL|Gravity.CENTER_HORIZONTAL, 0, 0);
t.setView(layout);
t.show();
}
 
}


Web Hosting
That's it. Hope this simple post may help you.

Customized Checkbox

Web Hosting
In this tutorial, I will show you a customized checkbox. See output below.


 Next is add this 2 image below in your drawable folder.


Next is add this xml named custom_checkbox_design.xml

<?xml version="1.0" encoding="utf-8"?>
     
    <selector xmlns:android="http://schemas.android.com/apk/res/android">
     
         <item android:state_checked="true" android:drawable="@drawable/checked" />
         <item android:state_checked="false" android:drawable="@drawable/unchecked" />
     

    </selector>

Next is your main_layout.xml

<RelativeLayout xmlns:android="http://schemas.android.com/apk/res/android"
    xmlns:tools="http://schemas.android.com/tools"
    android:layout_width="match_parent"
    android:layout_height="match_parent"
    android:paddingBottom="@dimen/activity_vertical_margin"
    android:paddingLeft="@dimen/activity_horizontal_margin"
    android:paddingRight="@dimen/activity_horizontal_margin"
    android:paddingTop="@dimen/activity_vertical_margin"
    tools:context=".MainActivity" >

    <TextView
        android:id="@+id/tv_title"
        android:layout_width="wrap_content"
        android:layout_height="wrap_content"
        android:text="Hobbies:"
        android:textAppearance="?android:attr/textAppearanceSmall" />

    <CheckBox
        android:id="@+id/chk_chc1"
        android:layout_width="wrap_content"
        android:layout_height="wrap_content"
        android:layout_alignParentLeft="true"
        android:layout_below="@+id/tv_title"
        android:button="@drawable/custom_checkbox_design"
        android:text="Basketball" />

    <CheckBox
        android:id="@+id/chk_chc2"
        android:layout_width="wrap_content"
        android:layout_height="wrap_content"
        android:layout_alignLeft="@+id/chk_chc1"
        android:layout_below="@+id/chk_chc1"
        android:button="@drawable/custom_checkbox_design"
        android:text="Playing Computer" />

    <CheckBox
        android:id="@+id/chk_chc3"
        android:layout_width="wrap_content"
        android:layout_height="wrap_content"
        android:layout_alignLeft="@+id/chk_chc2"
        android:layout_below="@+id/chk_chc2"
        android:button="@drawable/custom_checkbox_design"
        android:text="Reading Books" />

    <Button
        android:id="@+id/btn_check"
        android:layout_width="wrap_content"
        android:layout_height="wrap_content"
        android:layout_below="@+id/chk_chc3"
        android:layout_centerHorizontal="true"
        android:layout_marginTop="17dp"
        android:text="Check" />


</RelativeLayout>

And lastly is your MainActivity.java

package com.client.apps.views.checkbox;

import android.app.Activity;
import android.os.Bundle;
import android.view.Menu;
import android.view.View;
import android.view.View.OnClickListener;
import android.widget.Button;
import android.widget.CheckBox;
import android.widget.Toast;

public class MainActivity extends Activity implements OnClickListener{

Toast msg;
Button check;
CheckBox chk1, chk2, chk3;


@Override
protected void onCreate(Bundle savedInstanceState) {
super.onCreate(savedInstanceState);
setContentView(R.layout.activity_main);

check = (Button)findViewById(R.id.btn_check);
chk1 = (CheckBox)findViewById(R.id.chk_chc1);
chk2 = (CheckBox)findViewById(R.id.chk_chc2);
chk3 = (CheckBox)findViewById(R.id.chk_chc3);
check.setOnClickListener(this);

}

@Override
public boolean onCreateOptionsMenu(Menu menu) {
// Inflate the menu; this adds items to the action bar if it is present.
getMenuInflater().inflate(R.menu.main, menu);
return true;
}

@Override
public void onClick(View v) {
// TODO Auto-generated method stub

switch(v.getId()){
case R.id.btn_check:
if (chk1.isChecked()==true && chk2.isChecked()==true && chk3.isChecked()==true)
             {
                             msg = Toast.makeText(MainActivity.this,
                                             "BasketBall, PLaying Computer, Reading Books", Toast.LENGTH_SHORT);
                              msg.show();
             }
else if (chk1.isChecked()==true && chk2.isChecked()==false && chk3.isChecked()==false)
                             {
                             msg = Toast.makeText(MainActivity.this,
                                             "BasketBall", Toast.LENGTH_SHORT);
                                              msg.show();
                             }
else if (chk1.isChecked()==false && chk2.isChecked()==true && chk3.isChecked()==false)
             {
             msg = Toast.makeText(MainActivity.this,
                             "Playing Computers", Toast.LENGTH_SHORT);
                              msg.show();
             }  
else if (chk1.isChecked()==false && chk2.isChecked()==false && chk3.isChecked()==true)
             {
             msg = Toast.makeText(MainActivity.this,
                             "Reading Books", Toast.LENGTH_SHORT);
                              msg.show();
             } 
else if (chk1.isChecked()==true && chk2.isChecked()==true && chk3.isChecked()==false)
             {
             msg = Toast.makeText(MainActivity.this,
                             "BasketBall, Playing Computers", Toast.LENGTH_SHORT);
                              msg.show();
             } 
else if (chk1.isChecked()==false && chk2.isChecked()==true && chk3.isChecked()==true)
             {
             msg = Toast.makeText(MainActivity.this,
                             "Playing Computers, Reading Books", Toast.LENGTH_SHORT);
                              msg.show();
             } 
else if (chk1.isChecked()==true && chk2.isChecked()==false && chk3.isChecked()==true)
             {
             msg = Toast.makeText(MainActivity.this,
                             "BasketBall, Reading Books", Toast.LENGTH_SHORT);
                              msg.show();
             } 
else
             {
             msg = Toast.makeText(MainActivity.this,
                             "Nothing Selected", Toast.LENGTH_SHORT);
                              msg.show();
             }
break;
}
}


}


Web Hosting
That's it, hope this may help you. Happy Coding!


Customized Radio Button

Web Hosting
In this tutorial, I will show you customized radio button. See output below.


In your drawable folder, add this xml named custom_radio_button.xml:
<?xml version="1.0" encoding="utf-8"?>
<selector xmlns:android="http://schemas.android.com/apk/res/android" >
    
    <item android:state_checked="true" android:drawable="@drawable/checkedradiobutton" />
    <item android:state_checked="false" android:drawable="@drawable/unchekedradiobutton" />

</selector>


Next is add this 2 images in drawable folder.


Next is your layout.xml

<RelativeLayout xmlns:android="http://schemas.android.com/apk/res/android"
    xmlns:tools="http://schemas.android.com/tools"
    android:layout_width="match_parent"
    android:layout_height="match_parent"
    android:paddingBottom="@dimen/activity_vertical_margin"
    android:paddingLeft="@dimen/activity_horizontal_margin"
    android:paddingRight="@dimen/activity_horizontal_margin"
    android:paddingTop="@dimen/activity_vertical_margin"
    tools:context=".MainActivity" >

    <RadioGroup
        android:id="@+id/rdg_ask"
        android:layout_width="wrap_content"
        android:layout_height="wrap_content" >

        <RadioButton
            android:id="@+id/rb_chc1"
            android:layout_width="wrap_content"
            android:layout_height="wrap_content"
            android:button="@drawable/custom_radio_button"
            android:checked="true"
            android:textColor="#9D9D9D"
            android:text="Yes" />

        <RadioButton
            android:id="@+id/rb_chc2"
            android:layout_width="wrap_content"
            android:button="@drawable/custom_radio_button"
            android:layout_height="wrap_content"
            android:textColor="#9D9D9D"
            android:text="No" />

        <RadioButton
            android:id="@+id/rb_chc3"
            android:layout_width="wrap_content"
            android:button="@drawable/custom_radio_button"
            android:layout_height="wrap_content"
            android:textColor="#9D9D9D"
            android:text="Maybe" />
    </RadioGroup>

    <Button
        android:id="@+id/btn_check"
        android:layout_width="wrap_content"
        android:layout_height="wrap_content"
        android:layout_alignParentBottom="true"
        android:layout_centerHorizontal="true"
        android:text="Check" />


</RelativeLayout>

And lastly is your MainActivity.java

package com.client.apps.views.radiobutton;

import android.app.Activity;
import android.os.Bundle;
import android.util.Log;
import android.view.Menu;
import android.view.View;
import android.view.View.OnClickListener;
import android.widget.Button;
import android.widget.RadioButton;
import android.widget.RadioGroup;

public class MainActivity extends Activity implements OnClickListener {

Button btn_check;
RadioGroup radioGroup;
RadioButton get_val;
String radioButtonSelected = "";
@Override
protected void onCreate(Bundle savedInstanceState) {
super.onCreate(savedInstanceState);
setContentView(R.layout.activity_main);
radioGroup = (RadioGroup) findViewById(R.id.rdg_ask);
btn_check = (Button) findViewById(R.id.btn_check);
btn_check.setOnClickListener(this);

}

@Override
public boolean onCreateOptionsMenu(Menu menu) {
// Inflate the menu; this adds items to the action bar if it is present.
getMenuInflater().inflate(R.menu.main, menu);
return true;
}

@Override
public void onClick(View v) {
// TODO Auto-generated method stub
int selectedId = radioGroup.getCheckedRadioButtonId();
get_val = (RadioButton) findViewById(selectedId);
// find the radiobutton by returned id
switch(v.getId()) {
 
case R.id.btn_check:
Log.e("val", get_val.getText().toString());
break;
}
}

}


Web Hosting
That's it, hope this may help you. Happy Coding!

Relative Layout

Web Hosting
In this tutorial, I will show you using relative layout displaying in phone and tablet size in portrait and landscape mode. See output below.

Phone Landscape


Phone Portrait


Tablet Landscape


Tablet Portrait


Here's the MainActivity.java code:

package com.client.app.views.relativelayout;

import android.app.Activity;
import android.os.Bundle;
import android.util.DisplayMetrics;
import android.util.Log;
import android.view.Display;
import android.view.Menu;
import android.widget.Button;
import android.widget.EditText;
import android.widget.RelativeLayout;
import android.widget.TextView;
import android.widget.Toast;

public class MainActivity extends Activity {

RelativeLayout rl_first;
TextView tv_email;
EditText et_email;
Button btn_submit;

@Override
protected void onCreate(Bundle savedInstanceState) {
super.onCreate(savedInstanceState);
setContentView(R.layout.activity_main);

//get the height and width of the emulator
Display display = getWindowManager().getDefaultDisplay();
   DisplayMetrics outMetrics = new DisplayMetrics ();
   display.getMetrics(outMetrics);
   //end getting the height and width of the emulator
   //get the density, height, width
   float density  = getResources().getDisplayMetrics().density;
   float dpHeight = outMetrics.heightPixels / density;
   float dpWidth  = outMetrics.widthPixels / density;
   
   //compute for layout_width and editText
   float displays = (float) (dpWidth * 0.75);
   //compute for TextView and Button width
   float getForthWidth = displays/3;

   int b = (int) displays;
   Log.e("total_width", Float.toString(dpWidth));
   Log.e("3/4", Float.toString(displays));
   Log.e("tvbtn_width", Float.toString(getForthWidth));
   
   tv_email = (TextView)findViewById(R.id.tt_email);
   et_email = (EditText)findViewById(R.id.et_email);
   btn_submit = (Button)findViewById(R.id.button1);
   rl_first = (RelativeLayout)findViewById(R.id.rl_first);

   //check if the width is greater than 320 or smartphone size, the size below will be set.
   if(b > 320){
    tv_email.setWidth((int) getForthWidth);
    et_email.setWidth((int) b);
    btn_submit.setWidth((int) getForthWidth);
   }
}

@Override
public boolean onCreateOptionsMenu(Menu menu) {
// Inflate the menu; this adds items to the action bar if it is present.
getMenuInflater().inflate(R.menu.main, menu);
return true;
}

}


And the layout.xml:

<RelativeLayout xmlns:android="http://schemas.android.com/apk/res/android"
    xmlns:tools="http://schemas.android.com/tools"
    android:layout_width="match_parent"
    android:layout_height="match_parent"
    android:paddingBottom="@dimen/activity_vertical_margin"
    android:paddingLeft="@dimen/activity_horizontal_margin"
    android:paddingRight="@dimen/activity_horizontal_margin"
    android:paddingTop="@dimen/activity_vertical_margin"
    tools:context=".MainActivity" >

    <RelativeLayout
        android:id="@+id/rl_first"
        android:layout_width="fill_parent"
        android:layout_height="wrap_content"
        android:gravity="center_horizontal"
        android:layout_alignParentTop="true">
        
        
        <TextView
        android:id="@+id/tt_email"
        android:layout_width="wrap_content"
        android:layout_height="wrap_content"
        android:gravity="left"
        android:text="Email Add" />

   <EditText
       android:id="@+id/et_email"
       android:layout_width="wrap_content"
       android:layout_height="wrap_content"
       android:layout_below="@+id/tt_email"
       android:ems="13"
       android:gravity="left"
       android:inputType="textEmailAddress" >
       <requestFocus />
   </EditText>

   <Button
       android:id="@+id/button1"
       android:layout_width="wrap_content"
       android:layout_height="wrap_content"
       android:gravity="center"
android:layout_below="@+id/et_email"
       android:text="Submit" />
    
    </RelativeLayout>

</RelativeLayout>
Web Hosting
That's it, Hope this will help you.

Android Dimensions

Web Hosting

Screen densities and icon dimensions

QualifierDPIScaling factorLauncher iconAction bar, tab iconNotification icon (API 11)Notification icon (API 9)Notification icon (older)
ldpi1200.7536 x 36
32 x 32
24 x 24
18 x 18
18 x 18
16 x 16
12 x 19
12 x 12
19 x 19
16 x 16
mdpi1601.048 x 48
42 x 42
32 x 32
24 x 24
24 x 24
22 x 22
16 x 25
16 x 16
25 x 25
21 x 21
hdpi2401.572 x 72
64 x 64
48 x 48
36 x 36
36 x 36
33 x 33
24 x 38
24 x 24
38 x 38
32 x 32
xhdpi3202.096 x 96
84 x 84
64 x 64
48 x 48
48 x 48
44 x 44
32 x 50
32 x 32
50 x 50
42 x 42
xxhdpi4803.0144 x 144
126 x 126
96 x 96
72 x 72
72 x 72
66 x 66
48 x 75
48 x 48
75 x 75
63 x 63
Notice: the first icon dimension in table cell is full asset size, the second icon dimension is optical square. Dimension values are in pixels.
Tip: creating ldpi assets is not really needed anymore. The devices are rare and the platform will just scale down mdpi.

Google Play asset dimensions

Asset TypeRequiredImage typeDimension
ScreenshotyesJPEG or 24-bit PNG
(no alpha)
min length for any side: 320 px
max length for any side: 3840 px
High-res app iconyes32-bit PNG
(with alpha)
512 x 512 px
Feature graphicnoJPEG or 24-bit PNG
(no alpha)
1024 x 500 px
Promotional graphicnoJPEG or 24-bit PNG
(no alpha)
180 x 120 px
Video linknoURL of YouTube video-

Dimension units

UnitUnits / physical inchDensity independentSame physical size on every screen
pxvariesnono
in1yesyes
mm25.4yesyes
pt72yesyes
dp~160yesno
sp~160yesno

Size buckets

TypeDimension
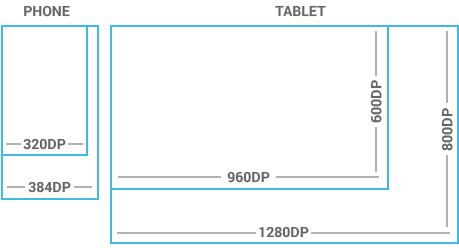
Handsetsmaller than 600 dp
Tabletlarger than or equal 600 dp
Size buckets
Notice: one dp (density-independent pixel) is one pixel on a 160 DPI screen.
Sources and useful links: Metrics and Grids

Views dimensions and spacing

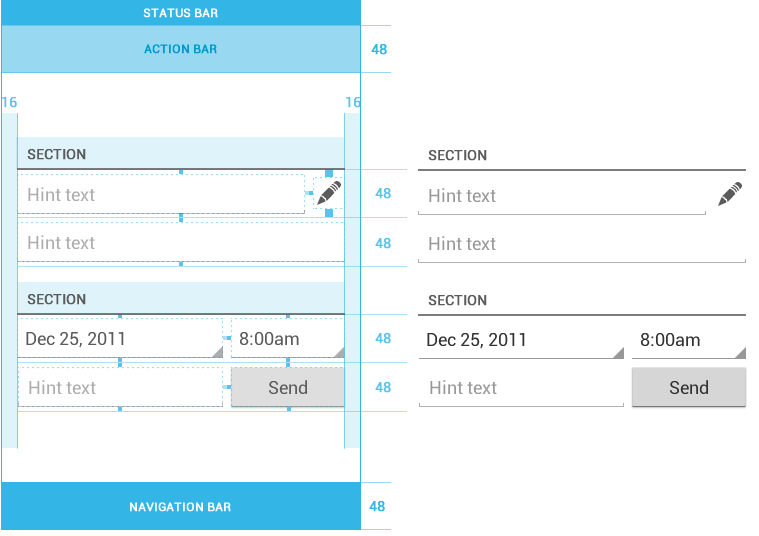
Touchable UI components are generally laid out along 48 dp units. Spacing between each UI element is 8 dp.
48dp rhythm
Button dimensions and spacing
Form dimensions and spacing
Sources and useful links: Metrics and Grids

Action bar height

QualifierDimension
Portrait48 dp
Landscape40 dp
Tablet56 dp
Sources and useful links: Action Bar

Text size

TypeDimension
Micro12 sp
Small14 sp
Medium18 sp
Large22 sp
Notice: one sp (scale-independent pixel) is one pixel on a 160 DPI screen if the user's global text scale is set to 100%.
Sources and useful links: Typography

Images and themes

Nine-patch

A Nine-patch drawable is a stretchable bitmap image, which Android will automatically resize to accommodate the contents of the view in which you have placed it as the background, e.g. nine-patch background for button, which must stretch to accommodate strings of various lengths. The rules for nine-patch image are following:
  • Standard PNG image with alpha
  • Filename suffix is ".9.png", e.g. "btn_login_normal.9.png"
  • Image has an extra 1 pixel wide border, used to define the stretchable/static/padding areas
  • Stretchable sections are indicated by 1 px wide black line(s) in the left and top part of the border
  • Static sections are indicated by fully transparent or white pixels
  • Padding area (optional) is indicated by 1 px wide black line in the right and bottom part of the border
Nine-patch
Sources and useful links: Canvas and DrawablesDraw 9-patch

Colors

Use color primarily for emphasis. Blue is the standard accent color in Android's color palette. Note that red and green may be indistinguishable to color-blind users. Primary colors are as follows:
  • #33B5E5
  • #AA66CC
  • #99CC00
  • #FFBB33
  • #FF4444
  • #0099CC
  • #9933CC
  • #669900
  • #FF8800
  • #CC0000
Sources and useful links: Color

Holo themes

Android provides three system themes:
  • Holo Light
  • Holo Dark
  • Holo Light with dark action bar
Sources and useful links: ThemesHolo Everywhere

Naming conventions

Naming conventions for drawables

File names must contain only lowercase a-z, 0-9, or _.
Drawables for the specific views (ListView, TextView, EditText, ProgressBar, CheckBox etc.) should be named like this views keeping the naming rules, e.g. drawable for CheckBox should be named "checkbox_on_bg.png".
Asset TypePrefixExample
Action barab_ab_stacked.9.png
Buttonbtn_btn_send_pressed.9.png
Dialogdialog_dialog_top.9.png
Dividerdivider_divider_horizontal.9.png
Iconic_ic_star.png
Menumenu_menu_submenu_bg.9.png
Notificationnotification_notification_bg.9.png
Tabstab_tab_pressed.9.png
Sources and useful links: naming conventions taken from the Android SDK

Naming conventions for icon assets

Asset TypePrefixExample
Iconsic_ic_star.png
Launcher iconsic_launcheric_launcher_calendar.png
Action bar iconsic_menuic_menu_archive.png
Status bar iconsic_stat_notifyic_stat_notify_msg.png
Tab iconsic_tabic_tab_recent.png
Dialog iconsic_dialogic_dialog_info.png
Sources and useful links: Icon Design Guidelines

Naming conventions for selector states

StateSuffixExample
Normal_normalbtn_order_normal.9.png
Pressed_pressedbtn_order_pressed.9.png
Focused_focusedbtn_order_focused.9.png
Disabled_disabledbtn_order_disabled.9.png
Selected_selectedbtn_order_selected.9.png
Sources and useful links: Touch Feedback

Organizing drawables to directories

One drawable must have the same file name for all screen densities (ldpi, mdpi, hdpi etc.) and all these files must be organized according to density into the following directories. Here's the resources directory structure for drawables:
  • res
    • drawable-ldpi
    • drawable-mdpi
    • drawable-hdpi
    • drawable-xhdpi
    • drawable-xxhdpi

Web Hosting