
Events are a useful way to collect data about a user's interaction with interactive components of your app, like button presses or screen touch etc. The Android framework maintains an event queue into which events are placed as they occur and then each event is removed from the queue on a first-in, first-out (FIFO) basis. You can capture these events in your program and take appropriate action as per requirements.
There are following three concepts related to Android Event Management:
- Event Listeners: The View class is mainly involved in building up a Android GUI, same View class provides a number of Event Listeners. The Event Listener is the object that receives notification when an event happes.
- Event Listeners Registration: Event Registration is the process by which an Event Handler gets registered with an Event Listener so that the handler is called when the Event Listener fires the event.
- Event Handlers: When an event happens and we have registered and event listener fo the event, the event listener calls the Event Handlers, which is the method that actually handles the event.
Event Listeners & Event Handlers
| Event Handler | Event Listener & Description |
|---|---|
| onClick() | OnClickListener() This is called when the user either clicks or touches or focuses upon any widget like button, text, image etc. You will use onClick() event handler to handle such event. |
| onLongClick() | OnLongClickListener() This is called when the user either clicks or touches or focuses upon any widget like button, text, image etc. for one or more seconds. You will use onLongClick() event handler to handle such event. |
| onFocusChange() | OnFocusChangeListener() This is called when the widget looses its focus ie. user goes away from the view item. You will use onFocusChange() event handler to handle such event. |
| onKey() | OnFocusChangeListener() This is called when the user is focused on the item and presses or releases a hardware key on the device. You will use onKey() event handler to handle such event. |
| onTouch() | OnTouchListener() This is called when the user presses the key, releases the key, or any movement gesture on the screen. You will use onTouch() event handler to handle such event. |
| onMenuItemClick() | OnMenuItemClickListener() This is called when the user selects a menu item. You will use onMenuItemClick() event handler to handle such event. |
There are many more event listeners available as a part of View class like OnHoverListener, OnDragListener etc which may be needed for your application. So I recommend to refer official documentation for Android application development in case you are going to develop a sophisticated apps.
Event Listeners Registration:
Event Registration is the process by which an Event Handler gets registered with an Event Listener so that the handler is called when the Event Listener fires the event. Though there are several tricky ways to register your event listener for any event, but I'm going to list down only top 3 ways, out of which you can use any of them based on the situation.
- Using an Anonymous Inner Class
- Activity class implements the Listener interface.
- Using Layout file activity_main.xml to specify event handler directly.
Below section will provide you detailed examples on all the three scenarios:
Event Handling Examples
EVENT LISTENERS REGISTRATION USING AN ANONYMOUS INNER CLASS
Here you will create an anonymous implementation of the listener and will be useful if each class is applied to a single control only and you have advantage to pass arguments to event handler. In this approach event handler methods can access private data of Activity. No reference is needed to call to Activity.
But if you applied the handler to more than one control, you would have to cut and paste the code for the handler and if the code for the handler is long, it makes the code harder to maintain.
Following are the simple steps to show how we will make use of separate Listener class to register and capture click event. Similar way you can implement your listener for any other required event type.
| Step | Description |
|---|---|
| 1 | You will use Eclipse IDE to create an Android application and name it as EventDemo under a package com.example.eventdemo as explained in the Hello World Example chapter. |
| 2 | Modify src/MainActivity.java file to add click event listeners and handlers for the two buttons defined. |
| 3 | Modify the detault content of res/layout/activity_main.xml file to include Android UI controls. |
| 4 | Define required constants in res/values/strings.xml file |
| 5 | Run the application to launch Android emulator and verify the result of the changes done in the aplication. |
Following is the content of the modified main activity filesrc/com.example.eventdemo/MainActivity.java. This file can include each of the fundamental lifecycle methods.
package com.example.eventdemo;

import android.os.Bundle;
import android.app.Activity;
import android.view.Menu;
import android.view.View;
import android.widget.Button;
import android.widget.TextView;

public class MainActivity extends Activity {

    @Override
    protected void onCreate(Bundle savedInstanceState) {
        super.onCreate(savedInstanceState);
        setContentView(R.layout.activity_main);

        //--- find both the buttons---
        Button sButton = (Button) findViewById(R.id.button_s);
        Button lButton = (Button) findViewById(R.id.button_l);

        // -- register click event with first button ---
        sButton.setOnClickListener(new View.OnClickListener() {
           public void onClick(View v) {
               // --- find the text view --
               TextView txtView = (TextView) findViewById(R.id.text_id);
               // -- change text size --
               txtView.setTextSize(14);
           }
        });

        // -- register click event with second button ---
        lButton.setOnClickListener(new View.OnClickListener() {
           public void onClick(View v) {
               // --- find the text view --
               TextView txtView = (TextView) findViewById(R.id.text_id);
               // -- change text size --
               txtView.setTextSize(24);
           }
        });
    }

    @Override
    public boolean onCreateOptionsMenu(Menu menu) {
        getMenuInflater().inflate(R.menu.main, menu);
        return true;
    }

}
Following will be the content of res/layout/activity_main.xml file:
<?xml version="1.0" encoding="utf-8"?>
<LinearLayout xmlns:android="http://schemas.android.com/apk/res/android"
   android:layout_width="fill_parent"
   android:layout_height="fill_parent"
   android:orientation="vertical" >


    <Button
    android:id="@+id/button_s"
    android:layout_height="wrap_content"
    android:layout_width="match_parent"
    android:text="@string/button_small"/>

    <Button
    android:id="@+id/button_l"
    android:layout_height="wrap_content"
    android:layout_width="match_parent"
    android:text="@string/button_large"/>

    <TextView
    android:id="@+id/text_id"
    android:layout_width="wrap_content"
    android:layout_height="wrap_content"
    android:capitalize="characters"
    android:text="@string/hello_world" />

</LinearLayout>
Following will be the content of res/values/strings.xml to define two new constants:
<?xml version="1.0" encoding="utf-8"?>
<resources>

    <string name="app_name">EventDemo</string>
    <string name="action_settings">Settings</string>
    <string name="hello_world">Hello world!</string>
   <string name="button_small">Small Font</string>
   <string name="button_large">Large Font</string>

</resources>
Following is the default content of AndroidManifest.xml:
<?xml version="1.0" encoding="utf-8"?>
<manifest xmlns:android="http://schemas.android.com/apk/res/android"
    package="com.example.guidemo"
    android:versionCode="1"
    android:versionName="1.0" >

    <uses-sdk
        android:minSdkVersion="8"
        android:targetSdkVersion="17" />

    <application
        android:allowBackup="true"
        android:icon="@drawable/ic_launcher"
        android:label="@string/app_name"
        android:theme="@style/AppTheme" >
        <activity
            android:name="com.example.guidemo.MainActivity"
            android:label="@string/app_name" >
            <intent-filter>
                <action android:name="android.intent.action.MAIN" />

                <category android:name="android.intent.category.LAUNCHER" />
            </intent-filter>
        </activity>
    </application>

</manifest>
Let's try to run your EventDemo application. I assume you had created your AVD while doing environment setup. To run the app from Eclipse, open one of your project's activity files and click Run  icon from the toolbar. Eclipse installs the app on your AVD and starts it and if everything is fine with your setup and application, it will display following Emulator window:
icon from the toolbar. Eclipse installs the app on your AVD and starts it and if everything is fine with your setup and application, it will display following Emulator window: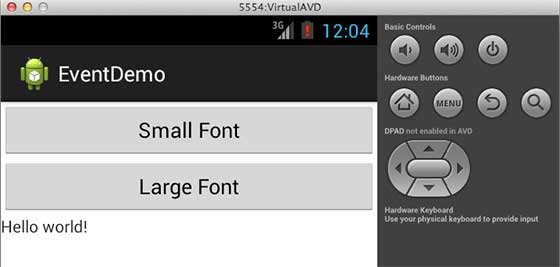
Now you try to click on two buttons one by one and you will see that font of the Hello World text will change, which happens because registered click event handler method is being called against each click event.
REGISTRATION USING THE ACTIVITY IMPLEMENTS LISTENER INTERFACE
Here your Activity class implements the Listener interface and you put the handler method in the main Activity and then you call setOnClickListener(this).
This approach is fine if your application has only a single control of that Listener type otherwise you will have to do further programming to check which control has generated event. Second you cannot pass arguments to the Listener so, again, works poorly for multiple controls.
Following are the simple steps to show how we will implement Listener class to register and capture click event. Similar way you can implement your listener for any other required event type.
| Step | Description |
|---|---|
| 1 | We do not need to create this application from scratch, so let's make use of above created Android application EventDemo. |
| 2 | Modify src/MainActivity.java file to add click event listeners and handlers for the two buttons defined. |
| 3 | We are not making any change in res/layout/activity_main.xml, it will remain as shown above. |
| 4 | We are also not making any change in res/values/strings.xml file, it will also remain as shown above. |
| 5 | Run the application to launch Android emulator and verify the result of the changes done in the aplication. |
Following is the content of the modified main activity filesrc/com.example.eventdemo/MainActivity.java. This file can include each of the fundamental lifecycle methods.
package com.example.eventdemo;

import android.os.Bundle;
import android.app.Activity;
import android.view.Menu;
import android.view.View;
import android.view.View.OnClickListener;
import android.widget.Button;
import android.widget.TextView;

public class MainActivity extends Activity implements OnClickListener {

    @Override
    protected void onCreate(Bundle savedInstanceState) {
        super.onCreate(savedInstanceState);
        setContentView(R.layout.activity_main);

        //--- find both the buttons---
        Button sButton = (Button) findViewById(R.id.button_s);
        Button lButton = (Button) findViewById(R.id.button_l);


        // -- register click event with first button ---
        sButton.setOnClickListener(this);
        // -- register click event with second button ---
        lButton.setOnClickListener(this);
    }

    //--- Implement the OnClickListener callback
    public void onClick(View v) {
       if(v.getId() == R.id.button_s)
       {
            // --- find the text view --
            TextView txtView = (TextView) findViewById(R.id.text_id);
            // -- change text size --
            txtView.setTextSize(14);
            return;
       }
       if(v.getId() == R.id.button_l)
       {
            // --- find the text view --
            TextView txtView = (TextView) findViewById(R.id.text_id);
            // -- change text size --
            txtView.setTextSize(24);
            return;
       }
    }

    @Override
    public boolean onCreateOptionsMenu(Menu menu) {
        getMenuInflater().inflate(R.menu.main, menu);
        return true;
    }

}
Now again let's try to run your EventDemo application. I assume you had created your AVD while doing environment setup. To run the app from Eclipse, open one of your project's activity files and click Run icon from the toolbar. Eclipse installs the app on your AVD and starts it and if everything is fine with your setup and application, it will display following Emulator window:
icon from the toolbar. Eclipse installs the app on your AVD and starts it and if everything is fine with your setup and application, it will display following Emulator window:
Now you try to click on two buttons one by one and you will see that font of the Hello World text will change, which happens because registered click event handler method is being called against each click event.
REGISTRATION USING LAYOUT FILE ACTIVITY_MAIN.XML
Here you put your event handlers in Activity class without implementing a Listener interface or call to any listener method. Rather you will use the layout file (activity_main.xml) to specify the handler method via the android:onClick attribute for click event. You can control click events differently for different control by passing different event handler methods.
The event handler method must have a void return type and take a View as an argument. However, the method name is arbitrary, and the main class need not implement any particular interface.
This approach does not allow you to pass arguments to Listener and for the Android developers it will be difficult to know which method is the handler for which control until they look into activity_main.xml file. Second, you can not handle any other event except click event using this approach.
Following are the simple steps to show how we can make use of layout file Main.xml to register and capture click event.
| Step | Description |
|---|---|
| 1 | We do not need to create this application from scratch, so let's make use of above created Android application EventDemo. |
| 2 | Modify src/MainActivity.java file to add click event listeners and handlers for the two buttons defined. |
| 3 | Modify layout file res/layout/activity_main.xml, to specify event handlers for the two buttons. |
| 4 | We are also not making any change in res/values/strings.xml file, it will also remain as shown above. |
| 5 | Run the application to launch Android emulator and verify the result of the changes done in the aplication. |
Following is the content of the modified main activity filesrc/com.example.eventdemo/MainActivity.java. This file can include each of the fundamental lifecycle methods.
package com.example.eventdemo;

import android.os.Bundle;
import android.app.Activity;
import android.view.Menu;
import android.view.View;
import android.widget.Button;
import android.widget.TextView;

public class MainActivity extends Activity{

    @Override
    protected void onCreate(Bundle savedInstanceState) {
        super.onCreate(savedInstanceState);
        setContentView(R.layout.activity_main);
    }

    //--- Implement the event handler for the first button.
    public void doSmall(View v)  {
       // --- find the text view --
       TextView txtView = (TextView) findViewById(R.id.text_id);
       // -- change text size --
       txtView.setTextSize(14);
       return;
   }
   //--- Implement the event handler for the second button.
   public void doLarge(View v)  {
       // --- find the text view --
       TextView txtView = (TextView) findViewById(R.id.text_id);
       // -- change text size --
       txtView.setTextSize(24);
       return;
   }

    @Override
    public boolean onCreateOptionsMenu(Menu menu) {
        getMenuInflater().inflate(R.menu.main, menu);
        return true;
    }

}
Following will be the content of res/layout/activity_main.xml file. Here we have to addandroid:onClick="methodName" for both the buttons, which will register given method names as click event handlers.
<?xml version="1.0" encoding="utf-8"?>
<LinearLayout xmlns:android="http://schemas.android.com/apk/res/android"
   android:layout_width="fill_parent"
   android:layout_height="fill_parent"
   android:orientation="vertical" >


    <Button
    android:id="@+id/button_s"
    android:layout_height="wrap_content"
    android:layout_width="match_parent"
    android:text="@string/button_small"
    android:onClick="doSmall"/>

    <Button
    android:id="@+id/button_l"
    android:layout_height="wrap_content"
    android:layout_width="match_parent"
    android:text="@string/button_large"
    android:onClick="doLarge"/>

    <TextView
    android:id="@+id/text_id"
    android:layout_width="wrap_content"
    android:layout_height="wrap_content"
    android:capitalize="characters"
    android:text="@string/hello_world" />

</LinearLayout>
Again let's try to run your EventDemo application. I assume you had created your AVD while doing environment setup. To run the app from Eclipse, open one of your project's activity files and click Run icon from the toolbar. Eclipse installs the app on your AVD and starts it and if everything is fine with your setup and application, it will display following Emulator window:
icon from the toolbar. Eclipse installs the app on your AVD and starts it and if everything is fine with your setup and application, it will display following Emulator window:
Now you try to click on two buttons one by one and you will see that font of the Hello World text will change, which happens because registered click event handler method is being called against each click event.
Exercise:
I will recommend to try writing different event handlers for different event types and understand exact difference in different event types and their handling. Events related to menu, spinner, pickers widgets are little different but they are also based on the same concepts as explained above.
No comments:
Post a Comment