Broadcast Receivers simply respond to broadcast messages from other applications or from the system itself. These messages are sometime called events or intents. For example, applications can also initiate broadcasts to let other applications know that some data has been downloaded to the device and is available for them to use, so this is broadcast receiver who will intercept this communication and will initiate appropriate action.
There are following two important steps to make BroadcastReceiver works for the systen broadcasted intents:
- Creating the Broadcast Receiver.
- Registering Broadcast Receiver
There is one additional steps in case you are going to implement your custom intents then you will have to create and broadcast those intents.
Creating the Broadcast Receiver
A broadcast receiver is implemented as a subclass of BroadcastReceiver class and overriding the onReceive() method where each message is received as a Intent object parameter.
public class MyReceiver extends BroadcastReceiver {

   @Override
   public void onReceive(Context context, Intent intent) {
      Toast.makeText(context, "Intent Detected.", Toast.LENGTH_LONG).show();
   }

}
Registering Broadcast Receiver
An application listens for specific broadcast intents by registering a broadcast receiver inAndroidManifest.xml file. Consider we are going to register MyReceiver for system generated event ACTION_BOOT_COMPLETED which is fired by the system once the Android system has completed the boot process.
<application
   android:icon="@drawable/ic_launcher"
   android:label="@string/app_name"
   android:theme="@style/AppTheme" >

   <receiver android:name="MyReceiver">
      <intent-filter>
         <action android:name="android.intent.action.BOOT_COMPLETED">
      </action>
      </intent-filter>
   </receiver>

</application>
Now whenever your Android device gets booted, it will be intercepted by BroadcastReceiver MyReceiverand implemented logic inside onReceive() will be executed.
There are several system generated events defined as final static fields in the Intent class. The following table lists a few important system events.
| Event Constant | Description |
|---|---|
| android.intent.action.BATTERY_CHANGED | Sticky broadcast containing the charging state, level, and other information about the battery. |
| android.intent.action.BATTERY_LOW | Indicates low battery condition on the device. |
| android.intent.action.BATTERY_OKAY | Indicates the battery is now okay after being low. |
| android.intent.action.BOOT_COMPLETED | This is broadcast once, after the system has finished booting. |
| android.intent.action.BUG_REPORT | Show activity for reporting a bug. |
| android.intent.action.CALL | Perform a call to someone specified by the data. |
| android.intent.action.CALL_BUTTON | The user pressed the "call" button to go to the dialer or other appropriate UI for placing a call. |
| android.intent.action.DATE_CHANGED | The date has changed. |
| android.intent.action.REBOOT | Have the device reboot. |
Broadcasting Custom Intents
If you want your application itself should generate and send custom intents then you will have to create and send those intents by using the sendBroadcast() method inside your activity class. If you use thesendStickyBroadcast(Intent) method, the Intent is sticky, meaning the Intent you are sending stays around after the broadcast is complete.
public void broadcastIntent(View view)
{
   Intent intent = new Intent();
   intent.setAction("com.tutorialspoint.CUSTOM_INTENT");
   sendBroadcast(intent);
}
This intent com.tutorialspoint.CUSTOM_INTENT can also be regsitered in similar way as we have regsitered system generated intent.
<application
   android:icon="@drawable/ic_launcher"
   android:label="@string/app_name"
   android:theme="@style/AppTheme" >

   <receiver android:name="MyReceiver">
      <intent-filter>
         <action android:name="com.tutorialspoint.CUSTOM_INTENT">
      </action>
      </intent-filter>
   </receiver>

</application>
Example
This example will explain you how to create BroadcastReceiver to intercept custom intent. Once you are familiar with custom intent, then you can program your application to intercept system generated intents. So let's follow the following steps to modify the Android application we created in Hello World Example chapter:
| Step | Description |
|---|---|
| 1 | You will use Eclipse IDE to create an Android application and name it as HelloWorld under a package com.example.helloworld as explained in the Hello World Example chapter. |
| 2 | Modify main activity file MainActivity.java to add broadcastIntent() method. |
| 3 | Create a new java file called MyReceiver.java under the package com.example.helloworld to define a BroadcastReceiver. |
| 4 | An application can handle one or more custom and system intents without any restrictions. Every indent you want to intercept must be registered in your AndroidManifest.xml file using <receiver.../> tag |
| 5 | Modify the detault content of res/layout/activity_main.xml file to include a button to broadcast intent. |
| 6 | Define a constant broadcast_intent in res/values/strings.xml file |
| 7 | Run the application to launch Android emulator and verify the result of the changes done in the aplication. |
Following is the content of the modified main activity filesrc/com.example.helloworld/MainActivity.java. This file can include each of the fundamental lifecycle methods. We have added broadcastIntent() method to broadcast a custom intent.
package com.example.helloworld;

import android.os.Bundle;
import android.app.Activity;
import android.view.Menu;
import android.content.Intent;
import android.view.View;

public class MainActivity extends Activity {

   @Override
   public void onCreate(Bundle savedInstanceState) {
      super.onCreate(savedInstanceState);
      setContentView(R.layout.activity_main);
   }
   @Override
   public boolean onCreateOptionsMenu(Menu menu) {
      getMenuInflater().inflate(R.menu.activity_main, menu);
      return true;
   }
   // broadcast a custom intent.
   public void broadcastIntent(View view)
   {
      Intent intent = new Intent();
      intent.setAction("com.tutorialspoint.CUSTOM_INTENT");
      sendBroadcast(intent);
   }
}
Following is the content of src/com.example.helloworld/MyReceiver.java:
package com.example.helloworld;

import android.content.BroadcastReceiver;
import android.content.Context;
import android.content.Intent;
import android.widget.Toast;

public class MyReceiver extends BroadcastReceiver {

   @Override
   public void onReceive(Context context, Intent intent) {
      Toast.makeText(context, "Intent Detected.", Toast.LENGTH_LONG).show();
   }

}
Following will the modified content of AndroidManifest.xml file. Here we have added <service.../> tag to include our service:
<manifest xmlns:android="http://schemas.android.com/apk/res/android"
   package="com.example.helloworld"
   android:versionCode="1"
   android:versionName="1.0" >
   <uses-sdk
      android:minSdkVersion="8"
      android:targetSdkVersion="15" />
   <application
       android:icon="@drawable/ic_launcher"
       android:label="@string/app_name"
       android:theme="@style/AppTheme" >
       <activity
           android:name=".MainActivity"
           android:label="@string/title_activity_main" >
           <intent-filter>
               <action android:name="android.intent.action.MAIN" />
               <category android:name="android.intent.category.LAUNCHER"/>
           </intent-filter>
       </activity>
       <receiver android:name="MyReceiver">
          <intent-filter>
          <action android:name="com.tutorialspoint.CUSTOM_INTENT">
          </action>
          </intent-filter>
      </receiver>
   </application>
</manifest>
Following will be the content of res/layout/activity_main.xml file to include a button to broadcast our custom intent:
<LinearLayout xmlns:android="http://schemas.android.com/apk/res/android"
   android:layout_width="fill_parent"
   android:layout_height="fill_parent"
   android:orientation="vertical" >

   <Button android:id="@+id/btnStartService"
   android:layout_width="fill_parent"
   android:layout_height="wrap_content"
   android:text="@string/broadcast_intent"
   android:onClick="broadcastIntent"/>

</LinearLayout>
Following will be the content of res/values/strings.xml to define two new constants:
<resources>

    <string name="app_name">HelloWorld</string>
    <string name="hello_world">Hello world!</string>
    <string name="menu_settings">Settings</string>
    <string name="title_activity_main">MainActivity</string>
    <string name="broadcast_intent">Broadcast Intent</string>

</resources>
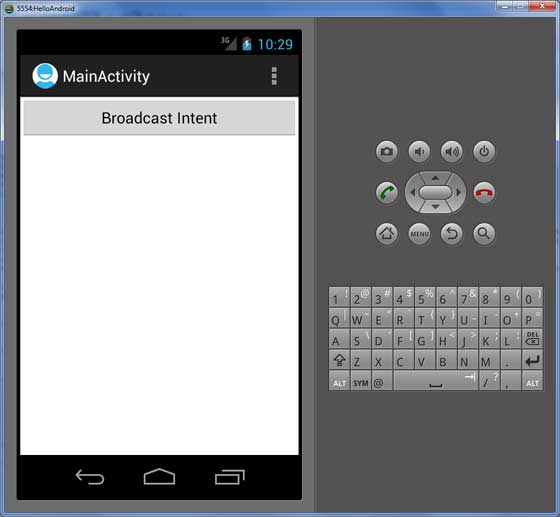
Let's try to run our modified Hello World! application we just modified. I assume you had created yourAVD while doing environment setup. To run the app from Eclipse, open one of your project's activity files and click Run  icon from the toolbar. Eclipse installs the app on your AVD and starts it and if everything is fine with your setup and application, it will display following Emulator window:
 icon from the toolbar. Eclipse installs the app on your AVD and starts it and if everything is fine with your setup and application, it will display following Emulator window:
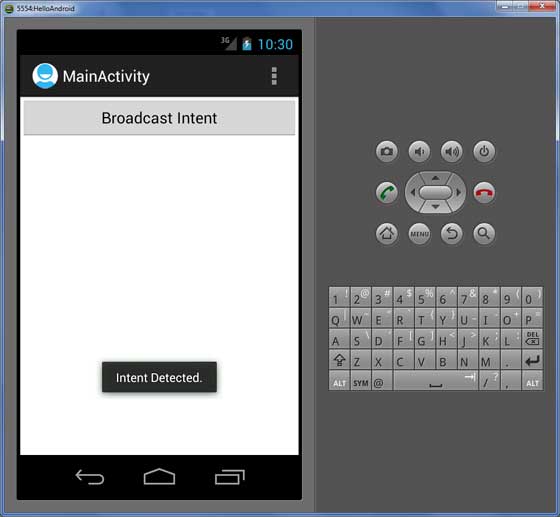
Now to broadcast our custom intent, let's click on Broadcast Intent button, this will broadcast our custom intent "com.tutorialspoint.CUSTOM_INTENT" which will be intercepted by our registered BroadcastReceiver ie. MyReceiver and as per our implemented logic a toast will appear on the bottom of the the simulator as follows:

You can try implementing other BroadcastReceiver to intercept system generated intents like system bootup, date changed, low battery etc.
No comments:
Post a Comment