
A Fragment is a piece of an application's user interface or behavior that can be placed in an Activity which enable more modular activity design. It will not be wrong if we say, a fragment is a kind of sub-acitivity. Following are important points about fragment:
- A fragment has its own layout and its own behavior with its own lifecycle callbacks.
- You can add or remove fragments in an activity while the activity is running.
- You can combine multiple fragments in a single activity to build a multi-pane UI.
- A fragment can be used in multiple activities.
- Fragment life cycle is closely related to the lifecycle of its host activity which means when the activity is paused, all the fragments available in the acivity will also be stopped.
- A fragment can implement a behavior that has no user interface component.
- Fragments were added to the Android API in Honeycomb version of Android which API version 11.
You create fragments by extending Fragment class and You can insert a fragment into your activity layout by declaring the fragment in the activity's layout file, as a <fragment> element.
Prior to fragment introduction, we had a limitation because we can show only a single activity on the screen at one given point in time. So we were not able to divide device screen and control different parts separately. But with the introduction of fragment we got more flexibility and removed the limitation of having a single activity on the screen at a time. Now we can have a single acitivity but each acitivity can comprise of multiple fragments which will have their own layout, events and complete lifecycle.
Following is a typical example of how two UI modules defined by fragments can be combined into one activity for a tablet design, but separated for a handset design.
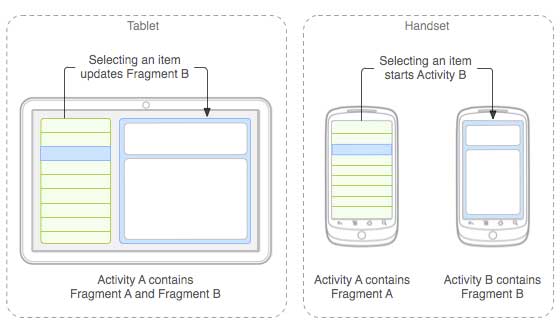
The application can embed two fragments in Activity A, when running on a tablet-sized device. However, on a handset-sized screen, there's not enough room for both fragments, so Activity A includes only the fragment for the list of articles, and when the user selects an article, it starts Activity B, which includes the second fragment to read the article.
Fragment Life Cycle
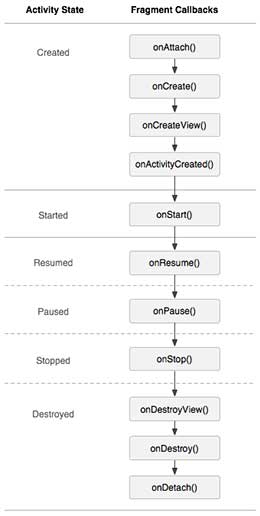
Android fragments have their own life cycle very similar to an android activity. This section briefs different stages of its life cycle.
Phase I: When a fragment gets created, it goes through the following states:
Phase II: When the fragment becomes visible, it goes through these states:
Phase III: When the fragment goes into the background mode, it goes through these states:
Phase IV: When the fragment is destroyed, it goes through the following states:
|  |
How to use Fragments?
This involves number of simple steps to create Fragments.
- First of all decide how many fragments you want to use in an activity. Fors example let's we want to use two fragments to handle landscape and portrait modes of the device.
- Next based on number of fragments, create classes which will extend the Fragment class. The Fragment class has above mentioned callback functions. You can override any of the functions based on your requirements.
- Corresponding to each fragment, you will need to create layout files in XML file. These files will have layout for the defined fragments.
- Finally modify activity file to define the actual logic of replacing fragments based on your requirement.
Here is the list of important methods which you can to override in your fragment class:
- onCreate() The system calls this when creating the fragment. You should initialize essential components of the fragment that you want to retain when the fragment is paused or stopped, then resumed.
- onCreateView() The system calls this callback when it's time for the fragment to draw its user interface for the first time. To draw a UI for your fragment, you must return a View component from this method that is the root of your fragment's layout. You can return null if the fragment does not provide a UI.
- onPause() The system calls this method as the first indication that the user is leaving the fragment. This is usually where you should commit any changes that should be persisted beyond the current user session.
Example
This example will explain you how to create your own Fragments. Here we will create two fragments and one of them will be used when device is in landscape mode and another fragment will be used in case of portrait mode. So let's follow the following steps to similar to what we followed while creatingHello World Example:
| Step | Description |
|---|---|
| 1 | You will use Eclipse IDE to create an Android application and name it as MyFragments under a package com.example.myfragments, with blank Activity. |
| 2 | Modify main activity file MainActivity.java as shown below in the code. Here we will check orientation of the device and accordingly we will switch between different fragments. |
| 3 | Create a two java files PM_Fragment.java and LM_Fragement.java under the packagecom.example.myfragments to define your fragments and associated methods. |
| 4 | Create layouts files res/layout/lm_fragment.xml and res/layout/pm_fragment.xml and define your layouts for both the fragments.< |
| 5 | Modify the detault content of res/layout/activity_main.xml file to include both the fragments. |
| 6 | Define required constants in res/values/strings.xml file |
| 7 | Run the application to launch Android emulator and verify the result of the changes done in the aplication. |
Following is the content of the modified main activity filesrc/com.example.mycontentprovider/MainActivity.java:
package com.example.myfragments;

import android.os.Bundle;
import android.app.Activity;
import android.app.FragmentManager;
import android.app.FragmentTransaction;
import android.content.res.Configuration;
import android.view.WindowManager;

public class MainActivity extends Activity {

   @Override
   protected void onCreate(Bundle savedInstanceState) {
      super.onCreate(savedInstanceState);

      Configuration config = getResources().getConfiguration();

      FragmentManager fragmentManager = getFragmentManager();
      FragmentTransaction fragmentTransaction =
      fragmentManager.beginTransaction();

      /**
      * Check the device orientation and act accordingly
      */
      if (config.orientation == Configuration.ORIENTATION_LANDSCAPE) {
         /**
         * Landscape mode of the device
         */
         LM_Fragment ls_fragment = new LM_Fragment();
         fragmentTransaction.replace(android.R.id.content, ls_fragment);
      }else{
         /**
         * Portrait mode of the device
         */
         PM_Fragment pm_fragment = new PM_Fragment();
         fragmentTransaction.replace(android.R.id.content, pm_fragment);
      }
      fragmentTransaction.commit();
   }

}
Create two fragment files LM_Fragement.java and PM_Fragment.java undercom.example.mycontentprovider package.
Following is the content of LM_Fragement.java file:
package com.example.myfragments;

import android.app.Fragment;
import android.os.Bundle;
import android.view.LayoutInflater;
import android.view.View;
import android.view.ViewGroup;


public class LM_Fragment extends Fragment{
   @Override
   public View onCreateView(LayoutInflater inflater,
      ViewGroup container, Bundle savedInstanceState) {
      /**
       * Inflate the layout for this fragment
       */
      return inflater.inflate(
      R.layout.lm_fragment, container, false);
   }
}
Following is the content of PM_Fragement.java file:
package com.example.myfragments;

import android.app.Fragment;
import android.os.Bundle;
import android.view.LayoutInflater;
import android.view.View;
import android.view.ViewGroup;


public class PM_Fragment extends Fragment{
   @Override
   public View onCreateView(LayoutInflater inflater,
      ViewGroup container, Bundle savedInstanceState) {
      /**
       * Inflate the layout for this fragment
       */
      return inflater.inflate(
      R.layout.pm_fragment, container, false);
   }
}
Create two layout files lm_fragement.xml and pm_fragment.xml under res/layout directory.
Following is the content of lm_fragement.xml file:
<?xml version="1.0" encoding="utf-8"?>
   <LinearLayout
   xmlns:android="http://schemas.android.com/apk/res/android"
   android:orientation="vertical"
   android:layout_width="fill_parent"
   android:layout_height="fill_parent"
   android:background="#7bae16">

   <TextView
   android:layout_width="fill_parent"
   android:layout_height="wrap_content"
   android:text="@string/landscape_message"
   android:textColor="#000000"
   android:textSize="20px" />

<!-- More GUI components go here  -->

</LinearLayout>
Following is the content of pm_fragment.xml file:
<?xml version="1.0" encoding="utf-8"?>
   <LinearLayout
   xmlns:android="http://schemas.android.com/apk/res/android"
   android:orientation="horizontal"
   android:layout_width="fill_parent"
   android:layout_height="fill_parent"
   android:background="#666666">

   <TextView
   android:layout_width="fill_parent"
   android:layout_height="wrap_content"
   android:text="@string/portrait_message"
   android:textColor="#000000"
   android:textSize="20px" />

<!-- More GUI components go here  -->

</LinearLayout>
Following will be the content of res/layout/activity_main.xml file which includes your fragments:
<?xml version="1.0" encoding="utf-8"?>
<LinearLayout xmlns:android="http://schemas.android.com/apk/res/android"
    xmlns:tools="http://schemas.android.com/tools"
    android:layout_width="fill_parent"
    android:layout_height="fill_parent"
    android:orientation="horizontal">

   <fragment
   android:name="com.example.fragments"
   android:id="@+id/lm_fragment"
   android:layout_weight="1"
   android:layout_width="0dp"
   android:layout_height="match_parent" />

   <fragment
   android:name="com.example.fragments"
   android:id="@+id/pm_fragment"
   android:layout_weight="2"
   android:layout_width="0dp"
   android:layout_height="match_parent" />

</LinearLayout>
Make sure you have following content of res/values/strings.xml file:
<?xml version="1.0" encoding="utf-8"?>
<resources>

    <string name="app_name">MyFragments</string>
    <string name="action_settings">Settings</string>
    <string name="hello_world">Hello world!</string>
    <string name="landscape_message">This is Landscape mode fragment
    </string>
    <string name="portrait_message">This is Portrait mode fragment
    </string>

</resources>
Let's try to run our modified MyFragments application we just created. I assume you had created yourAVD while doing environment setup. To run the app from Eclipse, open one of your project's activity files and click Run  icon from the toolbar. Eclipse installs the app on your AVD and starts it and if everything is fine with your setup and application, it will display Emulator window where you will click on Menu button to see the following window. Be patience because it may take sometime based on your computer speed:
icon from the toolbar. Eclipse installs the app on your AVD and starts it and if everything is fine with your setup and application, it will display Emulator window where you will click on Menu button to see the following window. Be patience because it may take sometime based on your computer speed: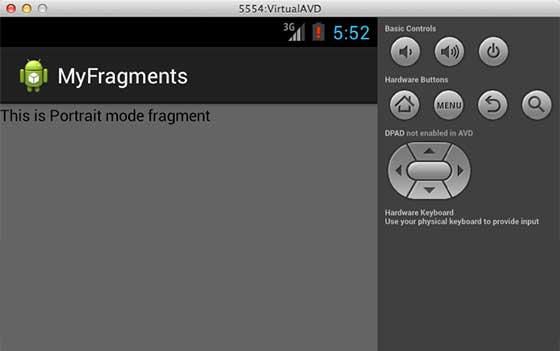
To change the mode of the emulator screen, let's do the following:
- fn+control+F11 on Mac to change the landscape to portrait and vice versa.
- ctrl+F11 on Windows.
- ctrl+F11 on Linux.
Once you changed the mode, you will be able to see the GUI which you have implemented for landscape mode as below:
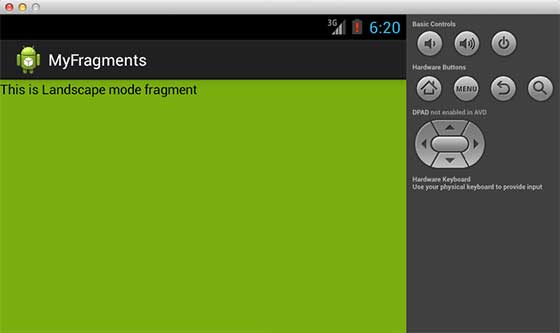
This way you can use same activity but different GUIs through different fragments. You can use different type of GUI components for different GUIs based on your requirements.
No comments:
Post a Comment